


Colorists, we’ve prepared a special treat for you! An interview with a very talented colorist Tulita, who kindly agreed to share her tips and tricks with Favoreads community. She has colored lots of our designs beautifully and we are 100% sure you’ll love her advice and find it very helpful. Enjoy and let us know in the comments below how much you like her artworks. You can find her arts on her Instagram page https://www.instagram.com/tulita_40/.
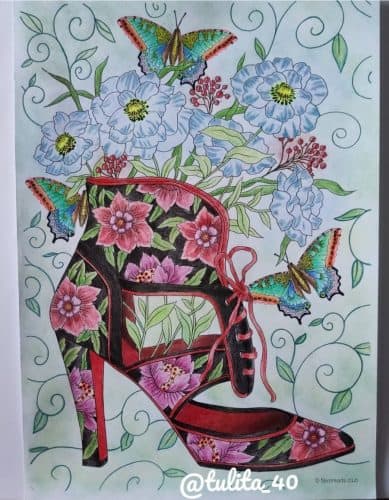
Coloring Tutorial
In this drawing, I used all the regular pencils that I have for school use. So that people could see that you don’t have to invest in expensive materials to create beautiful things.
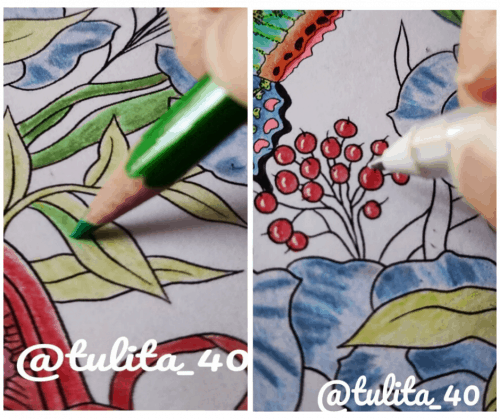
Step 1 – Shadows and Light
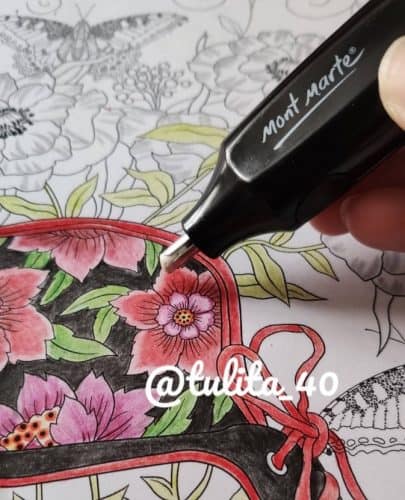
Normally I start with a very soft layer and a very light tone (if you don’t like it, you can easily erase it). Then I use darker tones in the same range to make the shadows and add volume. To color the cherries I applied the light tone first and then with the white marker I made a small line that creates light, always in the same direction and in the same part of where the light is supposed to come. One trick is to apply the darkest shade just below the white line, adding more volume and a more realistic look.
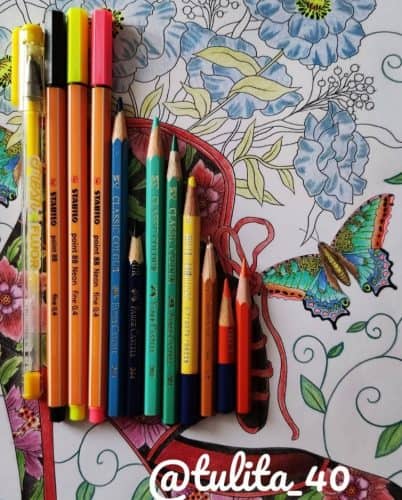
Step 2 – Butterfly
Here’s what I used to color the butterfly, as you can see I have very little left of some of these pencils.
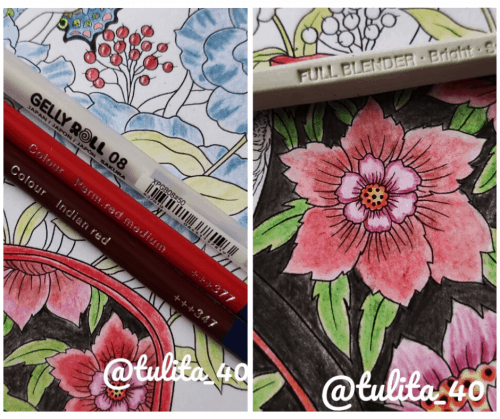
Step 3 – Blending
Since the flowers were grayscale, I used the light color for the entire flower and the dark color for the shadows. Using a blender makes a huge change for the texture of the drawing. The difference between the red petals where I have applied the blender and the blue ones where I haven’t is quite noticeable. I like this one a lot and it is from Caran D’ache and it adds a layer like shiny wax. I also have another one from Derwent that is more like a sandpaper type.
Step 4 – Illumination
The electric erasers are wonderful if you want to add some points of light. In this case, I used it to illuminate the edges of the flowers. I love it!!
Step 5 – Background
I colored the background with pastel chalks, I applied it in different tones with a touch of cotton and then I spread it rubbing gently. There are specific spray fixatives for pastel chalks but I sometimes use hairspray and it also works very well and of course, it is much cheaper.

Interview
Tell us a little about yourself. When did you start coloring and how did you learn it?
From a very young age, I always loved to color and everything related to the plastic arts, and after I grew up I took the coloring books of my little nephews, I enjoyed it a lot. I have never studied drawing or anything professionally, I capture what comes out.
What kind of designs do you like and why? What benefits of coloring do you experience?
I liked the mandalas a lot, but I have already left my comfort zone and I challenge myself with more elaborate and complex illustrations. The only things that are still a bit hard for me are the flowers and the skin, I think they require lots of patience and dedication that I don’t always have …The benefits of coloring for me are many, but the most important is that I do something I am passionate about, it relaxes me and makes me very happy.
What are your favorite coloring materials and brands?
My experience is limited because I can’t always afford all the things I wish to have, but… At the moment I have a box of 120 polychromos from Faber Castell and I love them. There is a huge difference between a drawing that I color with them or with cheaper pencils. But it’s ok if you can’t buy expensive pencils, with the cheaper ones you can also accomplish very nice things. The important thing about this is having fun without comparing yourself to anyone.
Where do you find inspiration?
When I go for a walk I take many photos, especially of flowers and if I have doubts about something I search Google.
Do you have a special coloring workplace or any preparation rituals?
I color in the living room and with the television on while I watch a movie, it doesn’t influence me at all, I don’t need to be alone or in silence.
What are your top 3 tips for a beginning colorist?
1. In the beginning, start with cheaper tools and simpler books, and as you become more confident and experienced, try more complex illustrations, and gradually invest in your coloring tools.
2. Do not compare yourself to anyone, especially to those who have been coloring for years, or have even studied art. Be aware that everyone is at their level and everything is a matter of practice and time.
3. Do not copy others, if you follow tutorials that are to learn techniques, such as shading and skin, which are challenging for all of us. But do not copy it. Discover your own unique style.
What do you think are the easiest types of designs to start with? Like “people”, “animals”, “mandalas” or something else? What did you start with?
At first, I even designed my own mandalas, and then later I found coloring books and discovered a world of wonderful illustrations. I would never recommend starting with people. The skin is very difficult and you will get frustrated for sure, I say it from my experience. I recommend that you buy books with grayscale designs, they make it much easier to learn. The best thing is that each one chooses what they like. This way they will be able to discover their strengths. And don’t buy books because everyone has them. Always choose whatever feels right to you.
What techniques do you usually use? (Such as shading, blending and etc.)
At the moment I only color with pencils, regular and watercolor when the paper allows it. I also use pastel chalk a lot. In some drawings I sometimes apply glitter glued finishes, especially on fairy wings or fantasy drawings.
Do you have any special tips for coloring with pencils?
The most important thing is to do it very smoothly without squeezing, which will allow you to create more mixtures with different tones and you’ll be able to make shadows that create volumes and add more life to the drawing. If you press too hard, the paper will get saturated with pigment and you will not be able to apply anything else, you will have a flat and lifeless result. For the shades you can add more layers of the same tone or even apply more pressure or you can also use a darker shade of the same range. But always in specific areas.
How do you color people? Any tips for coloring hair and skin tones?
The only secret that people who do wonders for the skin have given me, is a lot of patience and many very soft layers until you find the right tone. At the moment, the skin is still a great challenge for me, I have a lot to learn! I love black hair, but it is something that I also find very very difficult to make look beautiful. For the other colors, you take three shades of the same range from light to dark and you apply them. It looks very nice, especially if the illustration is grayscale, it is much easier and you learn a lot so later on, in other drawings, you will know where the shades are.
How Did You Like This Tutorial?
Did you learn something new from this tutorial? What was the most interesting part for you? If you have questions or want to thank Tulita for her story and tips, leave your comments below.
I learnt the use of the electric eraser, is a new option for me and I see that the final appearance is useful.
Thank you Tulita for sharing her experiences and tips. Thank you for this interesting interview.
Thank you so much for the feedback! Gald that the article was helpful to you!
I just found this article and had to say Thank You! I’ve been working on a picture and got stalled because I couldn’t figure out what to use in the background. I never even thought of using pastels and they would be just perfect to finish this picture with. Thank you!!!
By the way, your work is beautiful!